Setup #
As an administrator, you can set up the Apsona Batch Gift Entry tool for your users via the following steps.
- Install the Apsona Batch Gift Entry package from our AppExchange listing.
- Add licenses for all users who need the Batch tool, via Setup – Installed Packages – Manage Licenses – Apsona Batch Entry.
- Ensure that each Salesforce user profile that needs access to the tool includes access to the native Salesforce objects
Contact,Account,Opportunity,CampaignandOpportunity Contact Role, the NPSP objectsPayment,General Accounting UnitandGAU Allocation, and theBatchandBatch Itemobjects from the Apsona Batch Gift Entry package.- Users will need full read/write access to all the fields of all of the above objects. They will also need delete access to the
GAU Allocationobject and theBatch Itemobject. - If you do not provide access to the
General Accounting UnitandGAU Allocationobjects, your users will not be able to create Allocation records via the batch tool.
- Users will need full read/write access to all the fields of all of the above objects. They will also need delete access to the
- For each user profile that needs access to the tool, ensure that the corresponding Apsona configuration includes all of the above objects as visible objects.
- Ensure that your organization has a valid license for the Batch tool. You can do this via Setup – Manage licenses in Apsona. Please contact us if you need a license.
- If a user has recently been assigned a license, she needs to click Settings – Clear cache in Apsona so that the license assignment takes effect.
- Do not add the Batch or Batch item objects to Apsona’s menu bar. If the above setup steps are correctly carried out, the Batches menu item will appear to the right of the Settings menu.
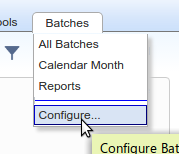
Configuration #
You can also configure the Batch Gift Entry tool to suit the needs and operational processes of your organization. Begin by clicking the Configure menu item in the Batches menu.
The configuration popup is displayed. The screen shot below shows this popup with annotations.

These configuration settings are intended to be made just once for your org. After you configure your org using this popup and have started using the batch tool to create batches, making changes in this popup can have unexpected consequences.
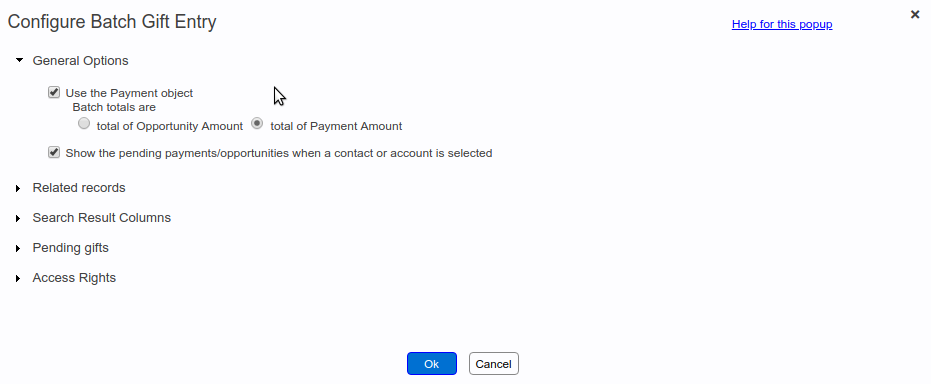
General options #
- The above screen shot shows the “General Options” section. If your organization uses payments (i.e., the NPSP Payment object), you can check this box and select whether the batch totals are determined by Opportunity amounts (i.e., the Opportunity’s Amount field) or Payment amounts (i.e., the Payment object’s Payment Amount field).
If your organization does not use payments, you can un-check this box. If you do so:
- Batch totals will always be determined by the Opportunity’s Amount field
- Fields from the Payment object will not be available for use in your batches.
Bear in mind that if you un-check this box, you will not be able to create or use any batch that contains one or more Payment fields in it.
- If you check the “Show pending payments” box, the Batch tool will automatically display pending payments or opportunities (depending on your choice for the above checkbox) when you select a donor from a search result. To see how this feature works, watch this animation. Notice how the “Select a Payment record” popup appears immediately after the user selects the Donor record. Without this box being checked, you would need to explicitly search for matching payments (by clicking the search button next to the Payment field) after selecting a donor.
Related records #
The options in this group determine the panels to be shown in the related records area underneath the main Opportunity and Payment fields area.
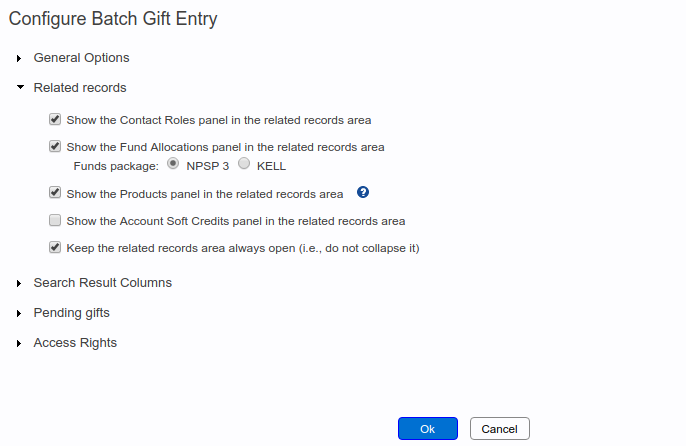
- Check the “Show Contact Roles” box if you want to add contact roles as part of the gift entry process, as described elsewhere. If you un-check this box, the Contact Roles panel will not appear.
- Check the “Show Fund Allocations” box if you want to add allocations as part of the gift entry process, as described elsewhere. If you un-check this box, the Funds panel will not appear. Note also that, if you have the KELL Funds package installed in your org, this configuration screen enables you to select that package as your Funds data store, instead of the NPSP GAU objects. If you do not have the KELL package installed, you won’t see this option.
- Check the “Show Products” box if you want the Opportunity Product object to be included in the related records area, so that you can add Product line items to each gift.
- Check the “Show Account Soft Credits” box if you want the Account Soft Credit object to be included in the related records area, so that you can add Account Soft Credit line items to each gift.
Search result columns #
In the third panel (screen shot below), you can configure the columns that appear in the batch data entry screen when you search for an Account, a Contact or a Opportunity/Payment.
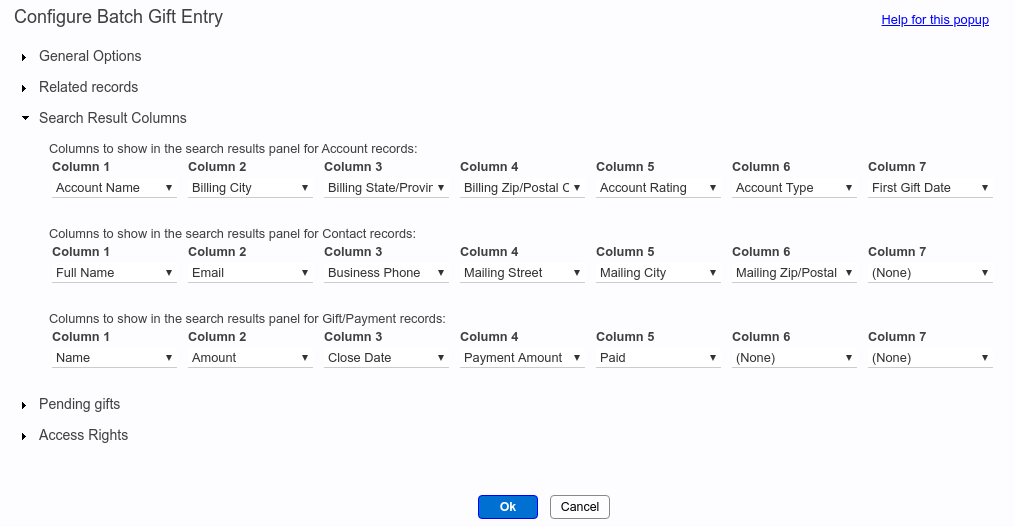
When selecting the columns to show for the Opportunity or Payment:
- If you have opted to use Payments in your org (as set in the General Options panel at the top), each of the column selector dropdowns will contain all of the fields the Opportunity object as well as the Payment object.
- If you have opted not to use Payments, only the fields in the Opportunity object will be shown in the dropdowns.
Pending gifts #
The third panel (screen shot below) lets you configure the filters used for pending gifts. These filters are used when you have selected a particular donor, either an individual or an organization, and you wish to view their pending gifts. These filters let you define what a “pending gift” means for your organization. The default setting is that, for individual donors, the gift must have probability 50% or more, and there must be at least one unpaid payment against the gift; and for organization donors, the default looks for probability 50% or more, and the gift should not be in Closed state. But of course you can use this configuration popup to set the filters exactly the way your organization requires.

Access rights #
In the Access rights panel, you can set up access rights for different classes of non-admin users.

Administrators will always have full access to all aspects of the Batch tool. But if you wish non-admins to have access to only selected aspects of the tool, you can configure the access via this section.
You can select up to two different non-admin profiles (for the second and third column in this panel) and set the corresponding access rights. For example, a non-admin user whose profile matches the one selected in the second column will have the access rights you set in that column. Similarly, a non-admin user whose profile matches the one selected in the third column will have the access rights you set in that column. Non-admin users whose profiles do not match the selected ones will have the access rights set in the last column.
These settings apply, of course, only to those users who have valid licenses to use the Apsona Batch Gift Entry tool.