Picture this: your annual auction has been a huge success. Congratulations! You have a spreadsheet chock full of donors with all their contact information, along with the items they won and additional donations they made. Some of these donors are new to you; some have been loyal fans of your organization for years. Now it’s time to get all that mission-critical data into Salesforce, so you can be sure to thank everyone and keep in touch with them for next year’s auction and other events.
The idea of data import can be daunting. Especially when you know you have duplicate rows of Contacts in your spreadsheet because of generous donors who won more than one item and donated during the Raise the Paddle session. And, some of your donors are already in your database, while some are new to you.
How can you be sure you import only one record for each unique Contact in your spreadsheet, and avoid importing Contact records for people who are already in Salesforce? And how can you match the newly imported or existing Contact records in Salesforce with their donations in your spreadsheet?
Enter Apsona’s Data Import tool. No more manual sorting and filtering — Apsona does all the heavy lifting for you, with some handy features that you’ll want to take advantage of right away. We’ll highlight three of them here:
- Seamless handling of duplicate records. During the import process, Apsona detects duplicate rows in your spreadsheet, based on matching criteria you provide. Not only that, it checks your spreadsheet against existing records in the database to avoid creating new duplicates.
- The Echo File: associates new record IDs with each relevant row in the spreadsheet. This means if you have three rows in your spreadsheet with David Smith as the Contact, Apsona will import just one David Smith Contact record — and then return an “echo file” with the new Contact ID filled in for each of the three David Smith rows. This makes import of related data, such as David Smith’s donations, a breeze.
- Add columns on the fly during import. Have you ever started an import, and then realized part way through the process that you were missing a crucial field? And had to back out and start all over again? With Apsona, you can add missing columns on the fly without having to leave the import screen.
Let’s see how all of this works!
Seamless handling of duplicate records
We’ll begin by importing our donors as Contact records. As we recall, we have multiple rows in our spreadsheet with the same donor.
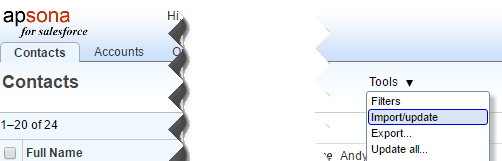
On the Apsona tab, click on Contacts. From the Tools menu on the right, choose Import/Update.
On this first import screen we’ll choose “Reject” as the option for how to handle Duplicates. This is what tells Apsona that if there are multiple rows in our spreadsheet with the same Contact, it should import just one of them. Not only that, Apsona is sophisticated enough to determine if you already have a Contact record for that donor — and not import another one. What a time-saver!
But what determines if it’s the same Contact? You can tell Apsona what your matching criteria is with the Match Fields picklist. In our Salesforce org, we uniquely identify Contacts with a combination of First Name, Last Name, and Email, so that’s what we’ll choose here:

Data Import Step 1: choosing options in the Duplicates and Match fields picklists
Once we’ve chosen our spreadsheet as the Data Source, we can click Next and move on to data mapping.
Apsona will automatically detect if the column names in our spreadsheet match the Salesforce field names, and map them accordingly. You can change the mappings, of course, to import into whatever fields you like.
Since First Name, Last Name, and Email are set correctly here, we’ll leave those alone. The Donation related fields — Donation Amount and Type — are also set correctly to Do Not Import. These fields will be handled when we import the donation data in a subsequent step.
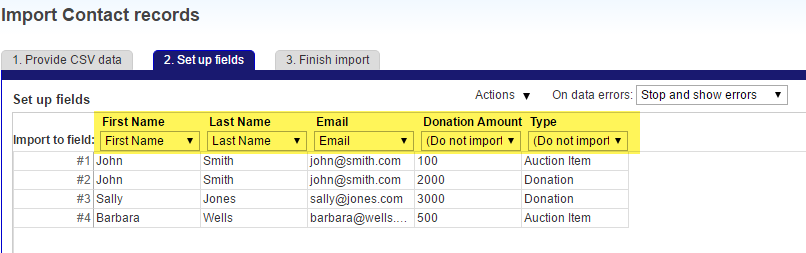
Data Import Step 2: Field mapping for Contact Data
If we leave the default option of Stop and Show Errors in the On data errors picklist, this will validate our data and let us know if we have any issues:

From the Data Errors dialogue, we see that Apsona, as promised, recognizes duplicate rows in our spreadsheet. Not only that, it has also determined that we already have an existing Contact record for one of our donors. Excellent!
Now that we’ve validated our data, we can choose Omit Erroneous Records in the On data errors picklist and click Next to get to the final step of Contact import.

Choose “Omit erroneous records” for the data error handling option
The Echo File: associates new record IDs with each relevant row in the spreadsheet.
After clicking the Import button on the final import screen, we have the option to download the import results:

Always click the Download button here to get your import results
Always download the import results! This is your “Echo File,” which contains the Contact IDs that will make importing related Donation records a breeze.
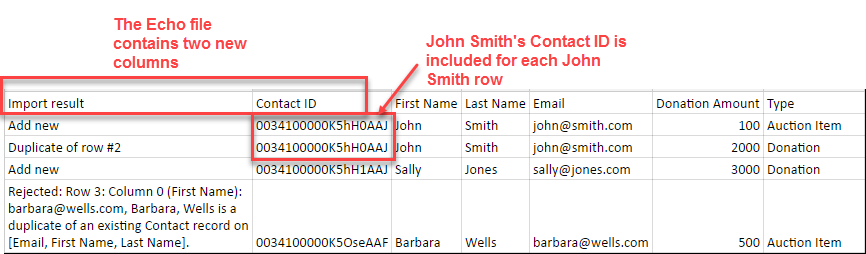
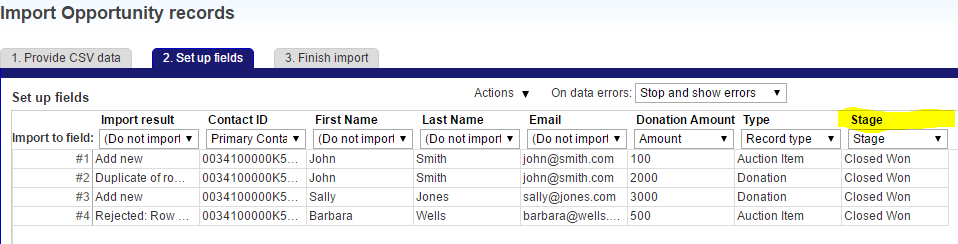
Echo File results
Notice that two columns have been added: Import Result, and Contact ID. And notice that the Contact ID for John Smith has been included for each John Smith row — even though the second John Smith record was not inserted. We also have the Contact ID for Barbara Wells, our existing Contact. And finally, even though we didn’t insert any Donation data on this round, the Donation columns are included in the Echo File.
Since we have all of our Contact IDs included in this handy Echo File along with all of our data, associating Donation records with the right Contact will be a snap. Just use the Echo File as the Data Source to import the Donations.
 Donation import: use the Contact ID provided in the Echo File to associate the Contact with the Donation.
Add columns on the fly during import
Now that all of our donation fields are mapped, we’re ready to import. But, when we click the Next button, we see this error screen:

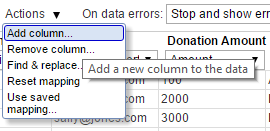
Oh dear, do we have to go back and edit the Echo File to add these columns and start all over? Never fear, Apsona is here! From the Actions menu, choose Add column:
For each missing column, choose the field name and enter a value.
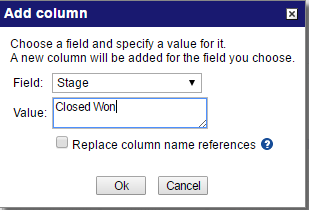
A new column will be created on the fly, and the value you specify will be filled in for every row in the spreadsheet:
New “stage” field has been added with “Closed Won” as the value for each row
But wait, what about the Opportunity Name field? We don’t want the same value for every row for this field. Apsona has taken care of this too with another handy feature, which allows you to reference the values of other fields in the new field value.
Our organization’s Opportunity naming convention is Donor First Name, Donor Last Name, Amount, and Record Type. For example, the Donation record for the first row would be named John Smith 100 Auction Item.
Simply check the Replace column name references checkbox in the Add Column dialogue, and choose the column names you want to use:
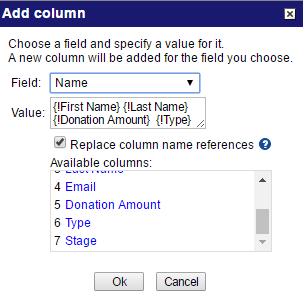
Use column name references for the Opportunity Name
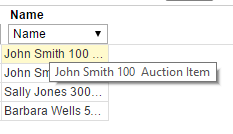
Voila! Apsona creates the Opportunity Name column, with the correct values filled in.
As an added bonus, if you are using the Non Profit Success Pack, Opportunity Contact Role records will automatically be created when you import the new Opportunity records. The Primary Contact will be set to the Contact you designated, with the default role of Donor, and the Primary checkbox will be checked.
As you can see, Apsona’s smart Data Import tool make it easy to import spreadsheets of related data, such as donors and their donation records — even when some of the data is duplicated. And with the ability to add columns to the import on the fly without having to edit the original data file, the import is even easier.